

Publishing Drill Data
The following information outlines how to publish drill plans to the drill rigs on your system and how to use Micromine Pitram Mobile on a tablet to submit drill data.
Publishing plans to the tablets
The Publish action sends a plan to every drill rig at once. Plans are attached to rings, not to a particular rig or tablet, so any rig that allocates itself to the ring sees the plan. This is deliberate: when a rig is swapped out mid-shift the replacement picks up the same ring with no engineering help.
On the Drill Plans tab,
-
Select the plans to release and,
-
Click Publish and Confirm.
DOME writes the rings of the published plans, each stamped with its Plan ID, to PITRAM reference data, reads back what was written, and shows the statuses from that read-back.
The ring appears on the tablets after their next synchronisation, which happens automatically when a tablet is within Wi-Fi coverage.

To withdraw a plan,
-
Click Unpublish (to change it) or Complete (when drilling is finished).
Both actions will remove the rings for the plan from the tablets on the next synchronisation.
Things to know
-
A ring holds one current plan. Publishing a new plan for a ring replaces the old one on the tablet. The driller sees only the newest plan, and actuals recorded against the old Plan ID disappear from the tablet view but stay in reporting.
-
A plan is published whole. If it spans several rings, they are all released together.
-
The Drill Plans screen checks PITRAM reference data when it opens and after every action. If reference data cannot be read, the screen is blocked with a message: Wait for the reference data service to return and then Refresh.
-
Publishing a plan does not publish other reference data; and publishing reference data from the Reference Data Editor does not publish plans.
Working on the Tablet
On the Tablet configured for Mobile, the driller does three things:
-
Allocate the rig to the ring,
-
Open Drill Data, and,
-
Submit each hole.
Work is done offline at the drill face; the tablet sends everything to the control room when it is in range of Wi-Fi.
In Micromine Pitram Mobile,
-
Log on and allocate the rig to the location and ring (sublocation) from the allocation screen, as for any other task.
Switching rings later is also done here.
-
Tap the Drill Data button on the menu.
The overview opens with the title Drill Data (<Plan ID>) and one tile per hole in the ring.
If the screen will not open, you will receive a message explaining why: The rig has no Drill Data profile or the allocated ring has no published plan.
Hole Overview
Each tile shows the hole name, its metres as actual / planned (for example 16/17), a comment icon when the hole has comments. When a hole is added on the tablet, the plan value is zero.
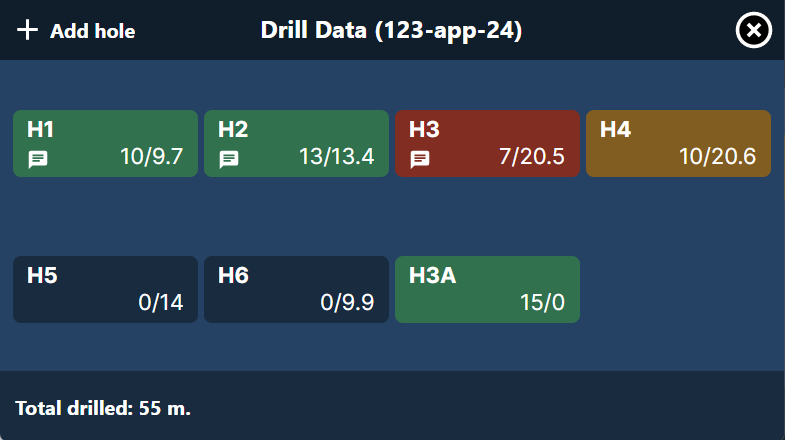
The tile colour is an indicator of the status for the hole; set by the driller:
| Colour | Status | Use It When |
|---|---|---|
| Blue | Not Started | No actuals yet. Every planned hole starts here. |
| Yellow | Incomplete | Started but not finished, for example another pass or reaming still needed. |
| Green | Complete | Drilled to the end. |
| Red | Abandoned | Given up, for example bad ground. Flag it so charge-up ignores the hole. |
Total metres drilled across the ring is displayed in the footer of the screen. Holes submitted in earlier shifts are displayed with their status and metres, so the next driller knows where to start.
Record a Hole
To record a hole in Mobile, on the Drill Data screen,
-
Tap the hole tile.
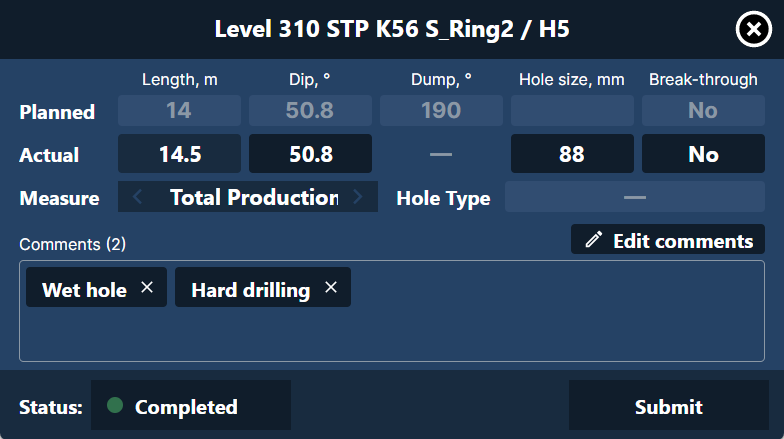
The hole detail shows a Planned row with the design values and an Actual row to fill in. The columns displayed will depend on the profile for the site. Length will always be included.
-
Enter the actual Length in metres. This is the one value that must be entered.
Change the Measure button if the metres should be recorded against a different measure (for example uphole instead of downhole).
-
Enter any other actuals captured by the site; such as Break-through Yes/No.
Note: A dash in the Actual row means the parameter is design-only. -
Tap Add comments (or Edit comments) to pick preset comments such as Water inflow or Blocked hole, or,
-
Tap New Comment to type a note (e.g. "void at 6 m").
Several comments can be selected; OK applies them and displays them as chips on the hole.
-
Tap the Status button and pick Incomplete, Complete or Abandoned.
Note: A hole with metres cannot be left as Not started. -
Tap Submit.
The hole returns to the overview with its new colour and metres value applied.
Resubmitting can be performed: Open the hole again after more drilling, raise the length, change the status, and submit. Only the added metres are counted again. Closing a hole with the cross instead of Submit asks whether to discard the unsubmitted changes.
Redrills and extra holes
A redrill is a new hole, not a resumed one. To add a redrilled hole,
-
Set the original hole to Abandoned and Submit it.
-
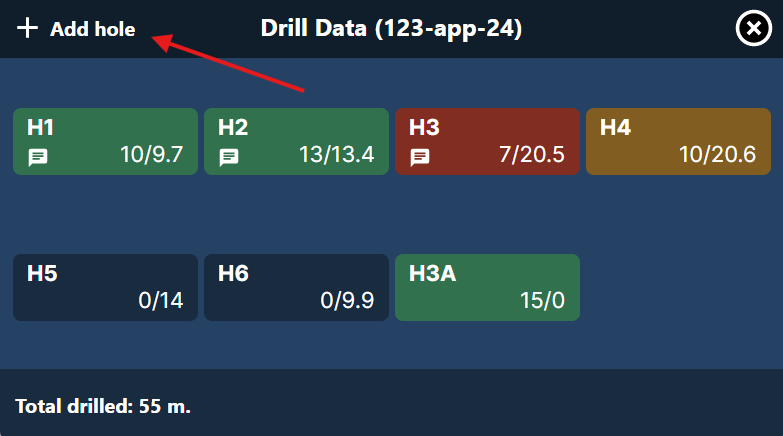
Tap Add hole on the overview screen.
-
Give the new hole a name the crew will recognise (e.g. 3A, 3.1).
-
Enter the actuals for the redrill, and
-
Tap Submit.
Added holes have no planned values, display only their actual metres, and are marked with a plus. The same Add hole flow covers any extra hole approved by the shift boss on the spot. An added hole that is closed without submitting is discarded; nothing is ever deleted from the overview.
Across shifts
Submitted holes stay on the tablet for the retention period in the profile (62 days by default), so a ring drilled over several shifts always shows what is done. Holes are tied to the Plan ID for the ring: If the engineer publishes a new plan for the ring, the tablet shows the new holes as Not started and the old actuals remain in reporting only. If a rig is driven from a different tablet, that tablet has only the holes it submitted itself until the tablet synchronises: Progress captured on another tablet is not pulled back down.
Reporting
Drill data can be reported using the Drillhole Actuals Report in DOME Reporting. For information on using the report and the information it contains, see Reporting Drill Data.